Products
Varyshop eCommerce allows you to add products and manage your product pages directly from the Website app. It also allows you to add product variants and digital files, translating the product page content, managing stock, and enabling product comparisons.
Add Products
Create Products
To create a product from the frontend, click "+ New" in the top-right corner, then "Product". Enter the "Product Name", "Sales Price", the default "Customer Taxes" for local transactions, and "Save". You can then update the product's details, add an image, and customize the product page. When you "Save", the product page is automatically published.
Tip:
- You can also create a product from the backend by going to Website > eCommerce > Products and clicking "New".
- Products created from the frontend are automatically published, while products created from the backend are not. To publish a product, click the "Go to Website" smart button to access the product page, then toggle the switch from "Unpublished" to "Published".
Import Products
To import product data using XLSX or CSV files, go to Website > eCommerce > Products, click the gear icon, then Import records.
Tip: To publish large batches of products, follow these steps:
- Go to Website > eCommerce > Products
- Remove the "Published" filter and switch to the "List" view
- Click the dropdown toggle icon and enable "Is published"
- Click the "Is Published" column to re-order it by published or unpublished products
- Select the products to publish by ticking their box
- In the "Is Published" column, tick the box for any of the selected products, then "Confirm" to publish them
Shop Page
To customize the layout of the main "Shop" page or modify its content, click "Edit". Go to the "Blocks" tab to add building blocks or to the "Customize" tab to change the page layout or add features:
-
"Layout": Select "Grid" or "List".
- "Size": Set the number of products displayed per page and line.
- "Style": Select "Default", "Cards", "Thumbnails", or "Grid".
- "Image Size": Choose the aspect ratio for the product images: "Landscape (4/3)", "Default (1/1)", "Portrait (4/5)", or "Vertical (2/3)". You can also adjust the display by changing the "Fill" options to best fit your design preferences.
-
"Search Bar": Toggle the switch to display a search bar at the top of the products page.
-
"Prod. Desc.": Toggle the switch to display the product description below the product's name.
-
"Categories": display product categories on the "Left", on the "Top", or both. If "Left" is selected, you can enable "Collapse Categories" to make the category menu collapsible.
-
"Datepicker": Toggle the switch to display a date range calendar to check the availability of rental products over a specific period. The Rental app must be installed to use this feature.
-
"Attributes": Show product attributes on the "Left" and/or display a dropdown toggle icon at the "Top" allowing customers to filter products based on their attributes.
- "Price Filter": Toggle the switch to display a "Price Range" bar, which allows customers to filter products according to a specific price range by dragging adjustable handles.
- "Product Tags": Toggle the switch to display the "Product Template Tags" on the product page and allow customers to filter products using those tags by going to the "Tags" section in the left column.
Product Page
To access a product's page, go to the "Shop" and click on the product. Click "Edit" to customize the page or edit its images.
To access the backend product form, click the gear "Product" button in the top-right corner of the product page. Alternatively, navigate to Website > eCommerce > Products and select the product. You can configure the product page from the form by adding variants, digital documents, or translating content.
Tip: Click the "Go to Website" smart button to return to the frontend product's page.
Customization
To customize a product page, click "Edit". Go to the "Blocks" tab to add building blocks.
Tip:
- When dragging and dropping a building block on the product page, placing it above or below the top or bottom blue lines makes it visible on all product pages.
- You can edit any text on your website simply by clicking on it while in "Edit" mode.
Go to the "Customize" tab to modify the page layout or add features:
-
"Terms and Conditions": Toggle the switch to display a link to your terms and conditions on the product page.
-
"Customers":
- "Rating": Allow logged-in portal users to submit product reviews by clicking the stars below the product's name and sharing their experience in the "Customer Reviews" section at the bottom.
- "Share": Add social media and email icon buttons allowing customers to share the product through those channels.
-
"Select Quantity": Toggle the switch to allow customers to select the product quantity they want to purchase.
-
"Tax indication": Toggle the switch to indicate if the price is VAT included or excluded.
-
"Variants": Show all possible product variants vertically as a "Products List" or horizontally as selectable "Options" to compose the variant yourself.
Image Customization
To customize the images available on the product page, go to the "Customize" tab:
- "Images Width": Changes the width of the product images displayed on the page.
- "Layout": The "Carousel" layout allows customers to navigate from one image to the next using the left arrow or right arrow; whereas the "Grid" displays four images in a square layout.
- "Image Zoom": Select the zoom effect for product images: "Magnifier on hover", "Pop-up on Click", "Both", or "None".
- "Thumbnails": Align thumbnails on the Left or at the Bottom.
- "Main Image": Click "Replace" to change the product's main image.
- "Extra Images": "Add" extra images or videos (including via URL) or "Remove all" product images.
Note: Images must be in PNG or JPG format and with a minimum size of 1024x1024 to trigger the zoom.
Product Variants
Product variants are different versions of the same product, such as various colors or materials, with potential differences in price and availability.
To configure product variants for a product:
- Go to Website > Configuration > Settings.
- Scroll down to the "Shop - Products" section and enable the "Product Variants" feature.
- Access the product forms and go to the "Attributes & Variants" tab, where you can add attributes and values, allowing customers to configure and select product variants on the product page. For multiple attributes, you can combine them to create specific variants.
To display or hide an attribute on the "Shop" page and allow visitors to filter them, go to Website > eCommerce > Attributes, click on the attribute, and select "Visible" or "Hidden" in the "eCommerce Filter Visibility" field.
Tip:
- To display the product attributes on the main Shop page, set the "Attributes" feature to "Left" using the website editor.
- To group attributes under the same section when comparing products, go to the "eCommerce Category" field and either select an existing category or create a new one.
Note: Two attribute values are needed to make the filter visible.
Digital Files
You can link digital files like certificates, eBooks, or user manuals to the products. These documents are available before payment on the product page or in the customer portal after checkout.
To link a digital file to a product, go to the product form and click the "Documents" smart button. Then, click "Upload" to upload a file directly, or for additional options, click "New", then "Upload your file".
Tip:
- You can link a URL instead of a digital file. To do so, click "New", go to the "Type" field, and select "URL".
- To edit an existing file, click the dropdown menu in the top-right corner of the document card and click "Edit".
Digital Files Available Before Payment
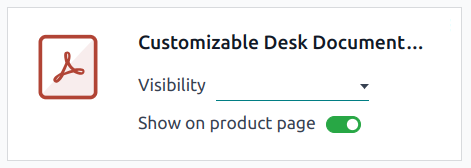
To make the file available on the product page (before payment), leave the "Visibility" field blank and toggle the "Show on product page" switch.
Digital Files Available After Payment
To make the file available (after payment), set the "Visibility" field to "Confirmed order" and turn off the "Show on product page" switch.
Translation
If multiple languages are available on your website, you can translate a product's information directly on the product form. Fields that support multiple languages are identifiable by their abbreviation language (e.g., EN) next to their field.
The eCommerce-related fields to translate are:
- "Product name"
- "Out-of-Stock Message" (under the "Sales" tab)
- "Sales Description" (under the "Sales" tab)
Note:
- Having untranslated content on a web page may be detrimental to the user experience and SEO. You can use the Translate feature to translate the page's content.
- To check the language(s) of your website, go to Website > Configuration > Settings and go to the "Website Info" section.
Website Availability
To set the product's website availability, navigate to the product form, go to the "Sales" tab, and in the "eCommerce shop" section, select the "Website" you wish the product to be available on. Leave the field blank to make the product available on all websites.
Note: You can make a product available on either one website or all websites, but selecting only some websites is not possible.
Stock Management
To enable and configure inventory management options, go to Website > Configuration > Settings, scroll down to the "Shop - Products" section and the "Inventory Defaults" sub-section.
Important:
- The Inventory app must be installed to see the inventory management options.
- To display the stock level on the product page, the "Product Type" field must be set to "Storable" in the product form.
Inventory
In the "Inventory Defaults" sub-section, fill in those fields:
- Warehouse
- "Out-of-Stock": Enable "Continue Selling" to allow customers to place orders even when the product is out of stock. Leave the box unchecked to prevent orders.
- "Show Available Qty": Displays the available quantity left under a specified threshold on the product page. The available quantity is calculated based on the "On hand" quantity minus the quantity already reserved for outgoing transfers.
Product Comparison
To allow website visitors to compare products based on their attributes, go to Website > Configuration > Settings, scroll down to the "Shop - Products" section, and enable "Product Comparison Tool".
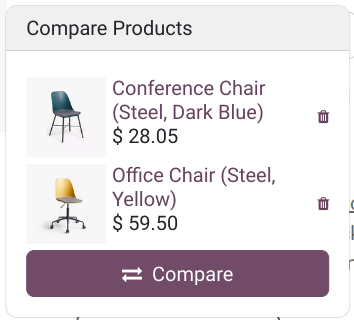
The "Compare" icon is now available on each product card on the main shop page when customers hover their mouse over it. To compare products, customers can click the "Compare" option on the products they want to compare, then click "Compare" in the pop-up window at the bottom of the page to reach the comparison summary.
Note:
- The "Product Comparison Tool" is only available for products with attributes.
- Selecting the "Compare" option from a product page is also possible.